1 / 23

IHS Engineering Club

Circuits &
Arduino Basics

Intro
Arduino
Elec
Parts
Code

Intro

What Can You Build?

  • Weather station — temperature, humidity, live display (I built one of these)
  • Robot car — obstacle avoidance, remote control
  • LED animations — strips, matrices, custom lighting
  • Alarm system — motion sensor triggers a buzzer or message
  • Game controller — buttons and joystic mapped to inputs
Intro
Arduino
Elec
Parts
Code

Today's Plan

What Are We Doing Today?

  1. 1.What is Arduino?
  2. 2.What is electricity?
  3. 3.What is a breadboard?
  4. 4.Basic components
  5. 5.Build a circuit
  6. 6.Write code to control it
Intro
Arduino
Elec
Parts
Code

Arduino

What Is Arduino?

Arduino is an open-source electronics platform that combines hardware and software.

  • A microcontroller connected to various input and outputs
  • Reads inputs (sensors, buttons) and controls outputs (LEDs, motors, displays)
  • Programmed using a simplified version of C/C++ in the Arduino IDE
  • Many different types of Arduinos
Intro
Arduino
Elec
Parts
Code

Code

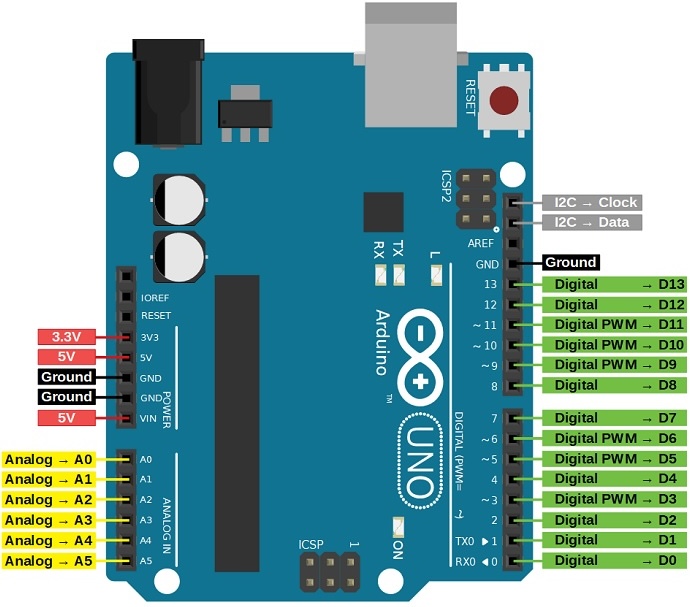
Arduino Uno: Pin Layout

  • Power: 5V 3.3V GND VIN
  • Digital pins (0–13): Output HIGH (5V) or LOW (0V)
  • Analog pins (A0–A5): Read variable voltages → 0 to 1023
  • PWM pins (~3,5,6,9,10,11): Simulate analog output via analogWrite() (0–255)
Arduino Uno pinout diagram
Intro
Arduino
Elec
Parts
Code

Electricity

How Does Electricity Flow?

Two types of current:

  • AC (Alternating Current) — what comes out of your wall outlet
  • DC (Direct Current) — what batteries and most electronics use
Intro
Arduino
Elec
Parts
Code

Electricity

DC: Direct Current

  • Electricity flows in a loop — from positive (+) to ground (−)
  • Think of it like water flowing through a pipe
  • The loop must be complete or nothing works
Intro
Arduino
Elec
Parts
Code

Electricity

Voltage, Current & Resistance

ConceptSymbolUnitWater Analogy
VoltageVVolts (V)Water pressure
CurrentIAmps (A)Flow rate
ResistanceROhms (Ω)Pipe narrowness
  • Voltage is the force pushing electrons through the circuit
  • Current is the rate which electricity is flowing
  • Resistance is the measure of the opposition to the flow of electric current
Intro
Arduino
Elec
Parts
Code

Components

What Is a Breadboard?

A board for building circuits without soldering.

  • Power rails — long columns on the sides
    Red → + (positive) Blue/black → − (ground)
  • Middle rows — each short row of 5 holes is connected horizontally
Breadboard diagram
Intro
Arduino
Elec
Parts
Code

Components

Resistor

  • Restricts or limits the flow of electricity
  • Measured in Ohms (Ω)
  • Colored stripes tell you its value
Resistor
Resistor circuit symbol
Intro
Arduino
Elec
Parts
Code

Components

Capacitor

  • Stores an electrical charge
  • Acts like a small rechargeable battery
Capacitor
Capacitor circuit symbol
Intro
Arduino
Elec
Parts
Code

Components

Switch

  • Manually breaks or connects a circuit
  • Open: no current flows (circuit is broken)
  • Closed: current flows (circuit is complete)
Switch circuit symbol
Intro
Arduino
Elec
Parts
Code

Components

Transistor

  • Electronically switches or amplifies signals
  • Has 3 pins: Base, Collector, Emitter
  • A small voltage at the Base switches current between Collector and Emitter
  • Transistors are the building blocks of all modern computers
Transistor
Transistor circuit symbol
Intro
Arduino
Elec
Parts
Code

Components

Potentiometer

  • Adjustable resistor used to control electrical signals
  • Has 3 pins: power, ground, and output (middle pin)
  • Output voltage changes with the knob position
Potentiometer
Potentiometer circuit symbol
Intro
Arduino
Elec
Parts
Code

Components

Diode

  • One-way valve for electricity
  • Acts like a one-way valve
Diode
Diode circuit symbol
Intro
Arduino
Elec
Parts
Code

Code

Programming an Arduino

Language: C/C++

void setup() {
  // Runs ONCE when the Arduino turns on
  // Use this to configure your pins
}

void loop() {
  // Runs FOREVER until the Arduino loses power
  // Put your main logic here
}
Intro
Arduino
Elec
Parts
Code

Code

Basic Functions

pinMode(pin, mode);// Set pin as INPUT or OUTPUT

digitalRead(pin);         // Read HIGH or LOW from a digital pin
digitalWrite(pin, value); // Write HIGH or LOW to a digital pin

analogRead(pin);          // Read 0–1023 from an analog pin (A0–A5)
analogWrite(pin, value);  // Write PWM 0–255 to a ~ pin

delay(ms);                // Pause execution for ms milliseconds

Serial.begin(baud);       // Start serial communication at baud rate
Serial.print(value);      // Print value to the serial monitor
Intro
Arduino
Elec
Parts
Code

Build

Follow Along: Fan Speed Indicator

Build a fan with a speed indicator using LEDs.

  • Turn potentiometer → motor spins faster (powered directly from the pot)
  • Below threshold 1: no lights
  • Middle zone: Green LED on
  • Above threshold 2: Red LED on

Parts: Potentiometer, fan, 2 LEDs, 2 resistors

Fan speed indicator circuit diagram
Intro
Arduino
Elec
Parts
Code

Wrap Up

Resources & Next Steps

  • arduino.cc/en/Tutorial — official getting started guides
  • projecthub.arduino.cc — example projects and ideas
  • adafruit.com/learn — projects with parts lists and code
Intro
Arduino
Elec
Parts
Code